Showing posts with label quilts. Show all posts

Thursday, February 16, 2012

Baby K's Quilt--One Last Time


It's almost too embarrassing to admit that I have finally finished my baby gift for Baby K, our youngest grandbaby--almost in time for her first birthday. (This sad photo is nearly as embarrassing.) But I post it anyway.

I almost added another border, but the quilt turned out to be about 44" by 44"--she will fit under it for a while still! Lol helped choose this border, which I think sets off the blocks very nicely. And I can stop feeling guilty.


Wednesday, October 19, 2011

Quilt for Baby K, Next Phase--Ideas, Anyone?


Progress has been made on Baby K's quilt, according to kind suggestions received here!
(My apologies for the lame photo--the quilt top is actually quite square in real life!)

I think the two new borders set it off well--the new white border brings out the blocks, and the scrap border seems to frame the whole thing. I've also chosen the fabric for the back--think it ties the top together very nicely.


Now for the next phase--with the addition of the borders, the quilt will be 36" by36"--a little on the small side still. Another border? Two? Pieced? Single fabric? White? Print? Would another border or borders add or detract? I'll let the ideas incubate.

Any input?


Wednesday, August 31, 2011

A Quilt for Baby K--Suggestions?


I'm working with my collection of reproduction vintage fabrics to make a special Grandma quilt for our newest little granddaughter.

Repro vintage prints make me happy--they remind me so much of the treasured quilts, made by my own grandmas, that were in our house when I was a child. A couple of which are mine today!

I've spent some enjoyable time hovering over my stash, and came up with a pleasing group of colors and pieces. So far, I've made 13 random 9-patch squares, then chose 12 of the same pieces and made the alternating applique' hearts.

I always seek the advice of my expert quilt block arranger (daughter Lol) when laying out a quilt, but in this case it doesn't seem to matter too much how the blocks are arranged, the colors and pieces are so random!

So, I have the blocks dealt out on my dollar store design wall, ready to be stitched together. At that point, the quilt will measure 28 inches by 28 inches.

So. . .what next? It definitely needs to be larger, so I'm thinking borders. Pieced? Narrow? Print? Multiple? If so, how many? I'll audition a few ideas with my stash fabrics and think.

Any ideas?


Link


Thursday, December 2, 2010

Birthday Quilt for T!


Grand-daughter T recently celebrated her birthday, and it was her turn for a quilt from Grandma. I have at last dipped into my I-Spy hoard (collected with Care's assistance) and created my first I-Spy project!

It was fun choosing just the right spies to delight T--since she has limited vision, we tried to choose pictures that are fairly good sized, bright colored, and crisply drawn. Lots of contrast works for T, and we found many of her favorite things in our piles! I used Care's excellent Disappearing Four Patch instructions found here, and the top went together smoothly.

As often happens, time grew short, and I took the top to Care's for quilting--she's much faster than I--and we worked on the borders and binding together. (Thanks, Aunt Care!) And check out the fabulous backing she had in her stash:

I love how the hippos march between the I-spies! There's a blue scrap border on the front, with a red scrap binding.

I'm happy to report that T loves her quilt, and was able to identify all the I-Spies with only a very little coaching--not surprisingly, the broccoli (a great T favorite) eluded her a bit.

Don't miss another of T's delightful gifts on Care's blog--Happy Birthday, T!!

Monday, November 1, 2010

Blogger's Quilt Festival!


It's Amy fourth Blogger's Quilt Festival over at Amy's Creative Side--I do believe I will join in the fun!

My Stack-and-Whack Star quilt, which I now love, had its beginnings (at least in my mind) as my Unfinished Quilt of Horror, or as Care dubbed it, the Vomit Quilt.

It truly began with the best of intentions, and then went swiftly awry. I had done a few stack-and-whack projects, and happily contemplated a stack-and-whack star quilt. I chose a pile of fabric pieces from my stash (how I do love a scrap project!) then stacked, whacked, shuffled, and began to sew my way through the pile. I was excited to see the random combination of fabrics in the blocks, but then some of them turned out seriously less than cute, and almost disturbing. Queasy, I quickly put it all away.


Over the next couple of years, I would take it out and wonder where I had gone wrong, then put it back in horror. At last, Care helped my put my finger on the problem--the fabric she ruthlessly called the 'vomit print', which had contaminated everything it had touched--and I am sure you can tell which it is. (Warning--you may want to shield your eyes at this point!)

With the worst of the blocks firmly eliminated, I was able to make progress--you could read more about the process here--and finished with a cute, girlie birthday quilt, now beloved by my grand-daughter Joy-joy. Here's a view of the back:


Since I was determined to make this a scrap project, I scrounged up the backing from scraps and my available yellow fabrics, and pieced the batting from scraps. I even had the perfect stripe for the binding! It was a fun learning process--triumph at last!


Tuesday, August 24, 2010

Little Quilt for Panda, Part 3


Joy-joy's special panda's quilt is at last finished and ready to be dropped off tomorrow, and I must say it matches Joy-joy's new quilt quite nicely!


Our design dilemma was solved quite neatly by exchanging the borders of the two lower blocks. I was concerned about the stars and borders in those two blocks matching too closely, but I think it works well, after all.

The outer borders and binding match those on the bigger quilt, and the quilting matches, too. The little quilt turned out to be 20" by 20"--and let me just say it is more square than the photo would seem to show!

All in all, quite a satisfying scrap project. Hope the colors don't keep them up all night.


Sunday, August 8, 2010

Quilt for Panda, Part 2


Still working on the re-arrangement of Panda's quilt squares.

Joy-joy says she 'needs' the pink fabrics to be diagonal from each other, and I completely agree. The balance is just off, and if we trade the two bottom blocks we will have the yellow and the blue frames side by side. Probably the best plan is to pick off the frames of the two bottom blocks and switch them. Sadly, this will put a blue frame on the blue star and a yellow frame on the yellow star. We'll see what happens.

I wonder if I am going into over-tweak on this!

Friday, August 6, 2010

Little Quilt for Panda, Part 1


Joy-joy now tells me her special stuffed animal friend, Panda, needs a small quilt of his own. (It seems he sleeps on a pillow at the foot of her bed and can get rather cold.)

She would like him to have a quilt that matches her own star quilt, so I've made four six-inch Nine Patch Star blocks in those same fabric scraps. As we discussed the layout of the blocks, Joy-joy and I agreed that there is a fundamental design problem--the two blocks with pink simply can not be side by side, and they can't be diagonal either.

I can see that I won't be happy with this project unless I trade the borders of the two bottom blocks. Shoot. Guess I'll be picking out the stitching.

Tuesday, July 27, 2010

Quilt of Horror, Part 6--Horrible No More!


With a great surge of relief, I have met the challenge--my misguided stack-and-whack project is redeemed, and passed along to a happy new owner! I have to say all horror has been eliminated--it's charming! Many thanks to all who participated in its transformation.


The back was fun to work out--I decided on yellow, and since this is a scrap project, I searched my stash, but was disgruntled to find that my existing piece was not long enough. I was forced to buy another piece of yellow, and set the two checkerboard style to echo the front a bit, with a strip of scrap rectangles to add some color and focus.

The back and front are layered with batting pieced together from extra pieces of Warm and Natural--I loosely zigzagged the edges of the off-cuts together. It seemed the quilting should be curved and organic to contrast with the angular design of the top, so I quilted giant sunflowers in the center of each block, surrounded by leafy vines. The outer border is also quilted in a vine pattern.

The binding makes me very happy! I found a striped piece in my stash in just the colors needed--you have to love a striped binding.


Joy-joy is the happy new owner, and requests a small matching quilt for her beloved stuffed panda--I hope to find my scraps and just by-pass the horror phase.

Monday, July 12, 2010

Miniatures Monday--Quilting Studio Cutting Table!


I've done a bit of deconstruction so I can post a corner view of my miniature quilting studio and all its delightful details. Let me give a guided tour!

The scene is in 1/12 scale--one foot, full size, is represented by one inch. The sewing table is about 3" high and the backs of both sides of the table are 5" wide, so the miniature quilter has plenty of room to work. You can see that she has displayed some of her completed projects on the wall above the table for inspiration. Under the table are her waste basket and some of her batting supply, stored in the corner.


She has a basket (made of manila folder) of 'fat quarters' in the corner of the table, ready for her next project, and several books for reference (made from a craft book ad). Her cutting mats, tiny rotary cutters and rulers ready to go. She has her tiny scissors, pincushions, and thread (tiny sections of fine dowel wrapped with thread), and microscopic measuring tape handy, with several cards of itty bitty buttons and tiny spools of ribbon. Her colored pencils are snips of colored electrical wire. Sewing time is limited (as it is for all of us!), so she keeps a clock handy!

Looks like she's ready for a new creative project!

Friday, July 9, 2010

Unfinished Quilt of Horror, Part 5


Scrap pink borders are attached, and I think they finish the top off nicely!

I didn't quite have enough pink scraps for the entire border, so I actually had to buy a small piece of the mottled pink fabric. Shoot.

The pinks blend a little better than the photo shows--and I can hardly wait to post the fabulous piece I found in my stash for the borders! Since this officially a scrap project, I hope I do have enough Warm and Natural batting scraps for the whole project--I'll join the scraps together with a zigzag stitch.

I think maybe this project can be formally declared un-horrible at last!

Wednesday, July 7, 2010

Unfinished Project of Horror, Part 4


This last weekend I took my updated blocks and consulted daughter Lol, my official Consultant for Block Layout--Lol has an excellent eye for color and flow.

We came up with what we think is a pleasing, balanced arrangement, with yellow and blue bordered blocks alternating checkerboard-style. And a peculiarly unbalanced photo. Sorry!

One difficulty in the arrangement was that with so few pleasing combinations of fabrics left in the 'good' selection of blocks, several of the them are negative images of each other--background/star with star/background--and others are similar enough to seem alike to the eye. The challenge is to separate them enough that they don't seem redundant.

Another major factor are the four blocks with pink background--we knew there would need to be one pink background in each row of three in order to distribute them pleasingly. It took some shuffling, since moving one block usually produces a domino effect as the combination of colors changes.

I have to say that I think our plan is very pleasing--the colors and shapes flow very nicely to the eye. One thing that surprised us is how the orange and the green flow together so well. The whole thing may be starting to become quite un-horrible!

We are thinking the whole thing will need an outer border to confine and outline it. I'm thinking a scrap border of bright pinks, slightly wider than the inner borders. I'll consult my stash.

Friday, July 2, 2010

Unfinished Project of Horror, Part 3

I tripped over my cat and wrenched my sore knee, so this week I've been somewhat less eager to hobble down the stairs to my sewing room. This does mean a little more time to sit and knit, BUT I think I am ready to steel myself and work on my awful stack-and-whack stars! I have decided to approach this on two fronts:

l. I'll frame each block with a solid color--thanks for the comments and suggestions! Thank you, ladies--I think you're right. The solids should calm and confine the blocks, yet still help them to relate to each other.

2. Although I kept telling myself I could make a second quilt that wouldn't be THAT bad, I have hobbled out to the dumpster and tossed in the twelve most offensive blocks. Yes--didn't even inflict them on some unsuspecting thrift store shopper! The buck stops here. It was tricky, since I absolutely abhor waste, but sometimes you just have to take a stand! (I think that when I'm tempted to say something 'isn't THAT bad', it probably is.) I will not be contaminating someone else's world with blocks of horror.


(And, on an aside, does this seem familiar?


It occurs to me that this, the worst of the departed blocks, is the fabric equivalent of Edvard Munch's well-known painting, 'The Scream'.)


So, I have auditioned the twelve more acceptable blocks on three backgrounds: blue, green, and yellow. Each of the pieces is from my stash, since this is a strictly a scrap project. I like the effect of the all the colors with the blocks, but I think the blue and the yellow make the best combination, so I'll frame half the blocks in each color and plan to set them together checkerboard-style.

I'm thinking a fairly wide strip to frame each block--2-1/2"? Off to the sewing machine!

Wednesday, June 30, 2010

Navajo Quilt--Finished!

At last! My mom's (or my dad's??) Navajo quilt project is finished--pieced, quilted, and bound. And very dramatic and graphic it is!

I've used my favorite Warm and Natural batting, and the backing is the matching red that was included with all the cut pieces. It seemed to me that quilting along the seam lines was the only real option-any other lines, especially curved lines, would only detract. So each seam line is machine quilted, and I have to say it has been borne out to me again that using polyester fabric in quilting is less than optimal! It just doesn't cooperate like 100% cotton fabric--it's ravelly and harder to work with.

After quilting I did decide to trim the width of the outer black border by about an inch--I think it seems more in proportion and sets the quilt off better.

Mom and Dad have been gone about two years now, and I think that I do still have another unfinished project or two from my parents. I suppose, though, that in a way the family is their biggest project, and unfinished at that! But turning out pretty well so far, and getting bigger all the time.

All in all, a beautiful quilt-- I think my parents would approve.

Sunday, June 20, 2010

Miniatures Monday--Tiny Sunbonnet Sue Quilt!


Hanging on the quilt rack in my miniature quilting studio is this tiny Sunbonnet Sue quilt, which is about 5" by 6". It looks so real for such a tiny scale-- it's actually made with a photocopier technique!

Gail, an acquaintance, made several tops using fabric a photograph, and a photocopier (couldn't say exactly how!) and taught a class on finishing the tiny quilts. I love how she got the lines and color so crisp! We backed them with a very small-scale print, hand quilted, then bound them by hand. I seem to remember that we used white cotton flannel for the batting--it seems to be just the right weight. It's perfect hanging in the little sewing room!

Thursday, June 10, 2010

Unfinished Project of Horror, Part 2


So, here's how it started--I had been having fun thinking about Stack-and-Whack quilt blocks, as I have mentioned, and was thinking in the back of my mind about how one might make Stack-and-Whack star blocks. I even made a few sketches and attempts, but didn't get too far, so when I was thrilled when I saw the project in a magazine!

I even had some fabric in mind-- prints from our epic series of Bright Color Quilts, which seemed to be never-ending. I'm afraid between us this is quilt #6 (plus maybe #7) from those original prints--Ibu seriously overbought, then I added, and I was becoming sick of them.
(PS, all those scraps have gone back to Ibu's house and I wash my hands of them--and she has plans for another one or two small quilts, at least!)

I'm afraid the whole project went awry from the beginning and I just couldn't tell at first. I scaled up the pattern from 9" squares to 12" squares, to use some pieces I already had cut--I see know that smaller would have been more pleasing. I'm not sure why I thought 25 blocks would be a good number--it's seriously overboard, but I suppose I thought I should just include all of the prints and be rid of them.

It started out fun to see the random combination of patterns as I sewed my way through the stack, but some of the blocks came out seriously un-cute and almost disturbing, and I had to put them away and think over the problem. I got them out a few times and put them right back in horror, asked Care what she thought, and put them away again. (She was horrified and recommended ditching them immediately.) She did, however, put her finger right on the problem--it's the print she ruthlessly called 'the vomit print'. This is seriously demoralizing, as I myself actually chose and bought that one.

So I suppose it was the combination of the random factor with the prints I chose that was the fatal error.

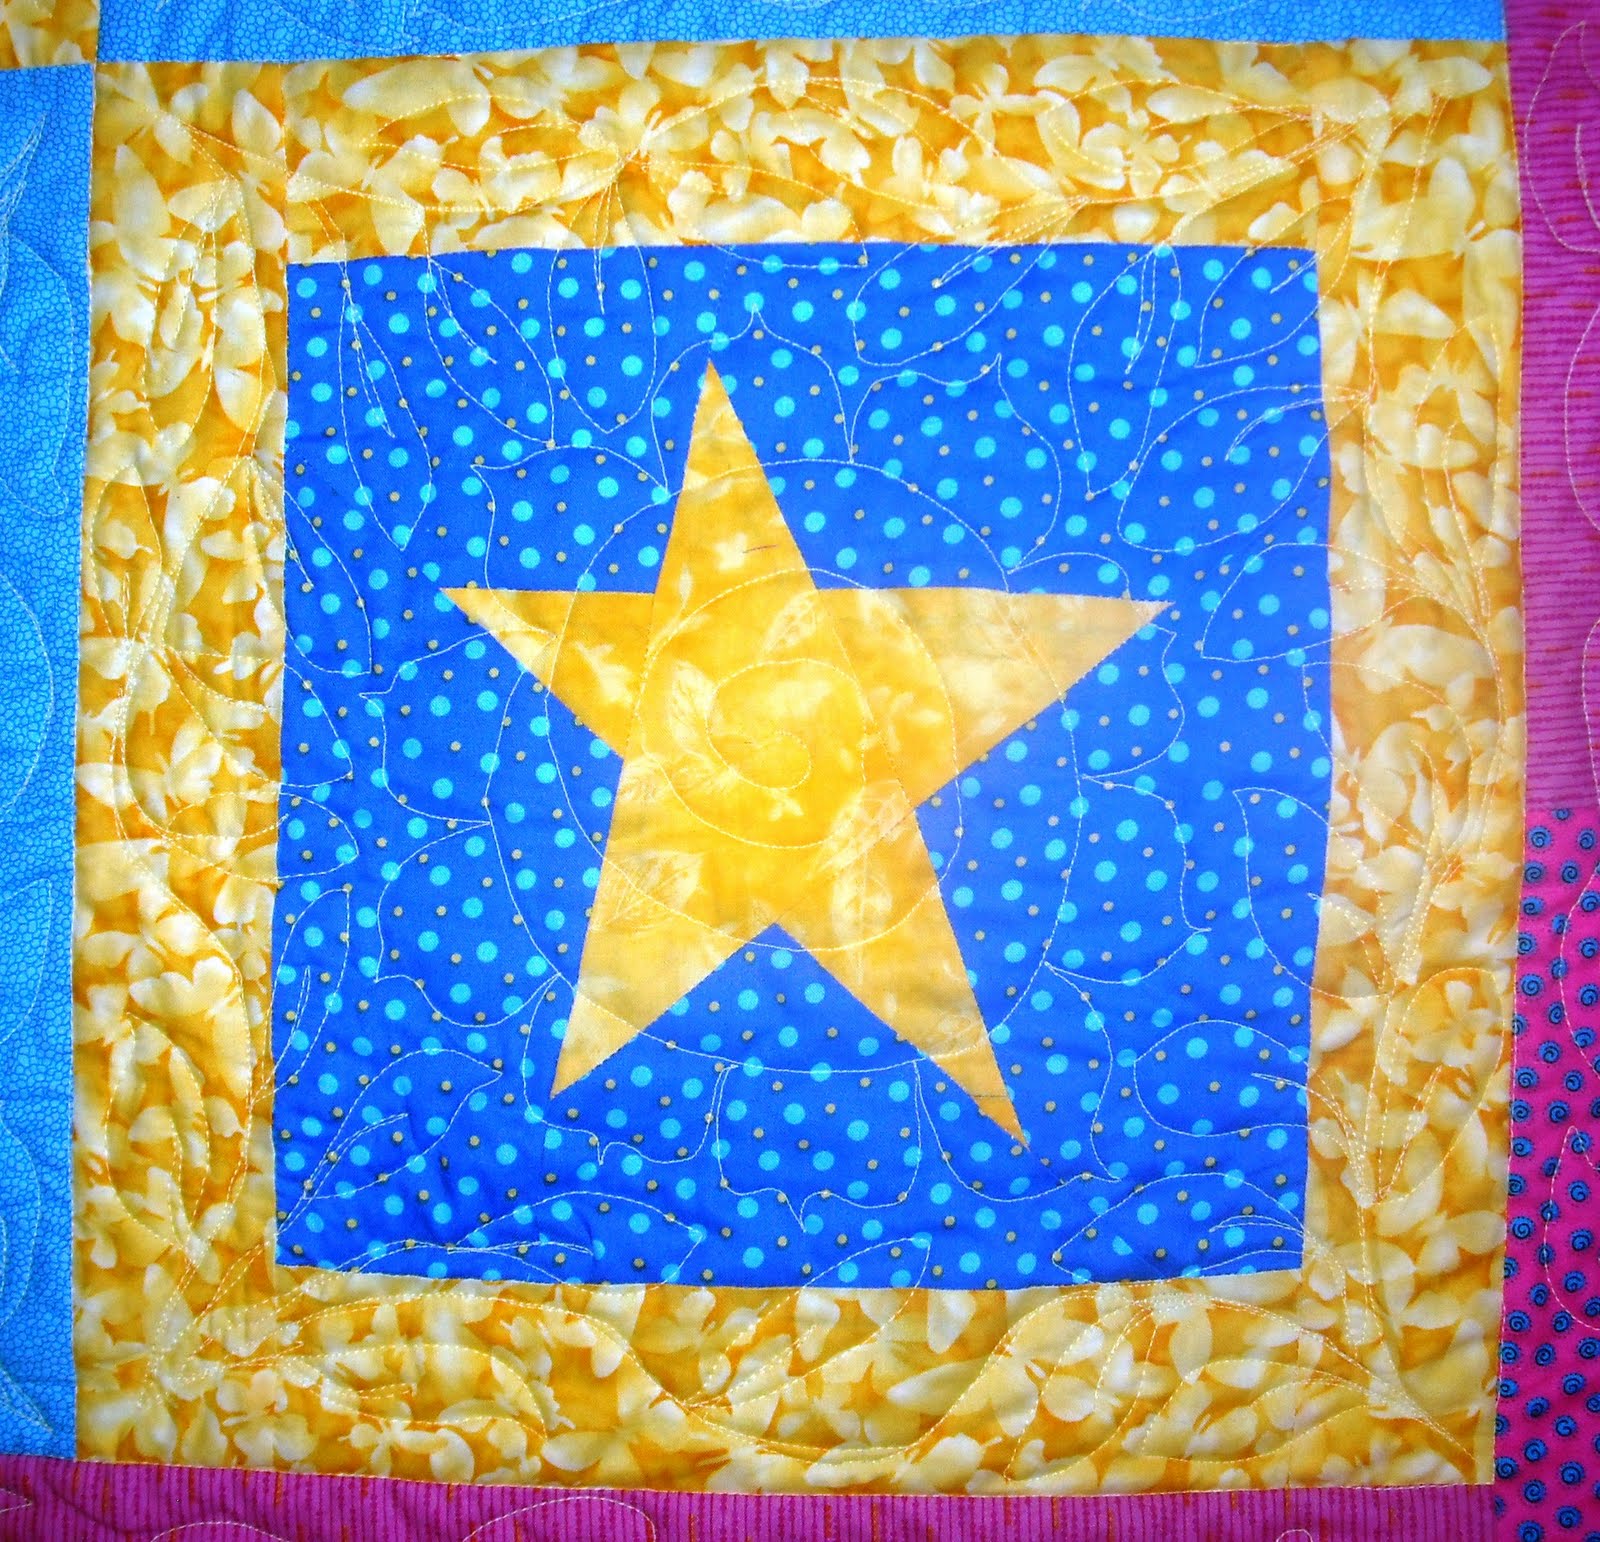
As you can see above, some of the blocks are perfectly acceptable. And some give me the willies. And the common factor of all the creepy ones is, indeed, the vomit print. It has contaminated all it touched. Which print is it? I'm sure you can tell.

(Wait, wait--these block seriously remind me of those '3-D Magic Eye' pictures!)

And its combination with the other major 'what was I thinking' print, those wavy stripes (or the seasick fabric) is seriously unfortunate. Should have known. Some of the seasick blocks almost work, though--they're only slightly bilious.


AND the daisy print--what was I thinking?

I am now back again at the (fatal?) point of thinking I can make it work if I just keep tweaking it, so I'm taking the blocks when I go to see Lol and Katie, two people of taste and discrimination, and beg their additional input and assistance. Maybe between us we can lay out at least one decent small quilt among all the blocks--if we don't get too queasy.

I'll dig out that article and post the name and issue.


Monday, June 7, 2010

Miniatures Monday--Sewing Chair and Tote Bag!


In my tiny quilting studio room box are this comfy sewing chair, cushioned by its 'pieced' pillow, and a quilt block tote--very handy for transporting the miniature quilter's sewing project!

The spool turned chair came in the delightful box when I won it, complete with the pillow, which is a printed motif from yardage. Fun to search out prints in a dollhouse appropriate scale!

I had a lot of fun a while back, working out traditional quilt blocks in a 1" to 1' scale. The little tote bag is made from a sashed 1" Nine Patch block, is lined, and has ribbon handles. Inside is another miniature quilting book--the cover is cut from a craft book offer and glued to a piece of poster board for dimension--and another pieced block, layered up and ready to quilt

Some people like to have scale-appropriate dolls who live in their miniature scenes. Personally, I don't want anyone else living in my tiny spaces--they're just for me! Maybe I'll just sit down and finish that block. . .

Sunday, June 6, 2010

Navajo Quilt, Part 3--Borders Complete!


I've decided I like the way the black border finishes off the design of the Navajo quilt, and it's attached all around. Since it's 10" wider and 10" longer with the borders, it won't completely fit on my fence anymore, so this is only a partial portrait!

Now I'm still wondering if the black border isn't just a little too wide, but I think I won't decide whether to trim it down a little just yet--I could even do that after I start quilting. Definitely a black binding--anything else would be distracting for sure.

I have the red for the back, and Warm and Natural batting. Guess I'd better sweep and mop the kitchen floor, so I can tape it out for pin-basting!


Tuesday, June 1, 2010

Navajo Quilt, Part 2


Still thinking about borders for my unfinished Navajo quilt, I've pulled out the chart that was with the stack of cut squares. A red border was charted in, half the width of the squares themselves.

Since there seems to be plenty of red backing fabric, I went ahead and added the border, and I think it adds-it definitely confines and frames the whole thing. Next decision--a black border as well? I think I'll pick up some black yardage and audition it by laying the corner of the quilt top on the corner of the yardage, trying different border widths, and then we'll see.

Monday, May 31, 2010

Miniatures Monday--Shelves for Tiny Quilting Studio!


On one wall of my miniature quilting studio are these wooden shelves, full of needful items for the dedicated (miniature) quilter.

The shelves themselves are made from craft basswood, measure about 4" by 8", and are stained in a warm shade. I made the basket from strips of file folder, woven together and painted white. The tiny antique sewing machine is a commercial miniature, and the quilting book covers were cut from a craft book offer and glued to a backing of poster board for dimension.

The delightful folded 'quilts' on the bottom shelf are bits of print fabric, in just the right scale to be realistic, and the pillow is made from a fabric motif, cut out, backed and stuffed.

The big fun here was going through scraps from many sewers to find small-scale prints that seem plausible as miniature yardage and fat quarters for the basket--the fun was seeing how many really worked! They are all cut to the same size, folded, and sorted by color. All in all, a delightful place to go in the imagination!